Correctly identifying the Water Inlet Direction on a 3-way valve is essential for proper operation with The Attendant. This ensures that the actuator moves the valve as intended, reliably switching flows between Pool, Spa, or Features without manually adjusting the CAM inside the actuator.
The Water Inlet Direction feature is designed for plumbing configurations where the valve is not installed in the traditional way with water entering through the center port. In these situations, the setting allows the actuator to operate with only a 90° rotation, eliminating the need to adjust the CAMs.
For example, if a valve is controlling both a spa spillover and a bubbler line, this feature lets the actuator open either side independently, or both together, depending on how the features are set up in The Attendant.
If your plumbing is non-traditional but you never need both ports open at the same time, you can skip this feature and manually set the actuator CAMs to limit travel instead. Manual CAM adjustment may also be required if the actuator cannot physically be installed in the orientations shown in the diagrams below.
If you are looking for instructions on how to virtually CAM a valve, please see our Virtual Cams Guide.
Step 1: Enter Installer Mode
- Open The Attendant app.
- Tap the hamburger menu (☰).
- Go to Maintenance → Installer Mode.
- Choose your entry method and tap Enter Installer Mode.
Step 2: Select the 3-Way Valve
- Go to the Devices tab.
- Tap the › icon on the valve you want to configure.
- Scroll down to Water Inlet Direction.
Understanding Water Direction
Before programming, it’s important to understand valve orientation and how actuators interact with water flow. In the Poolside app you’ll see three selectable positions:

Middle (Factory Position):
The actuator is mounted with the motor housing (the larger, rounded end of the actuator) centered directly above the middle port of the valve. There are RETURN and SUCTION examples below.


Left Position:
The actuator is mounted so the motor housing is aligned with the left-side port.
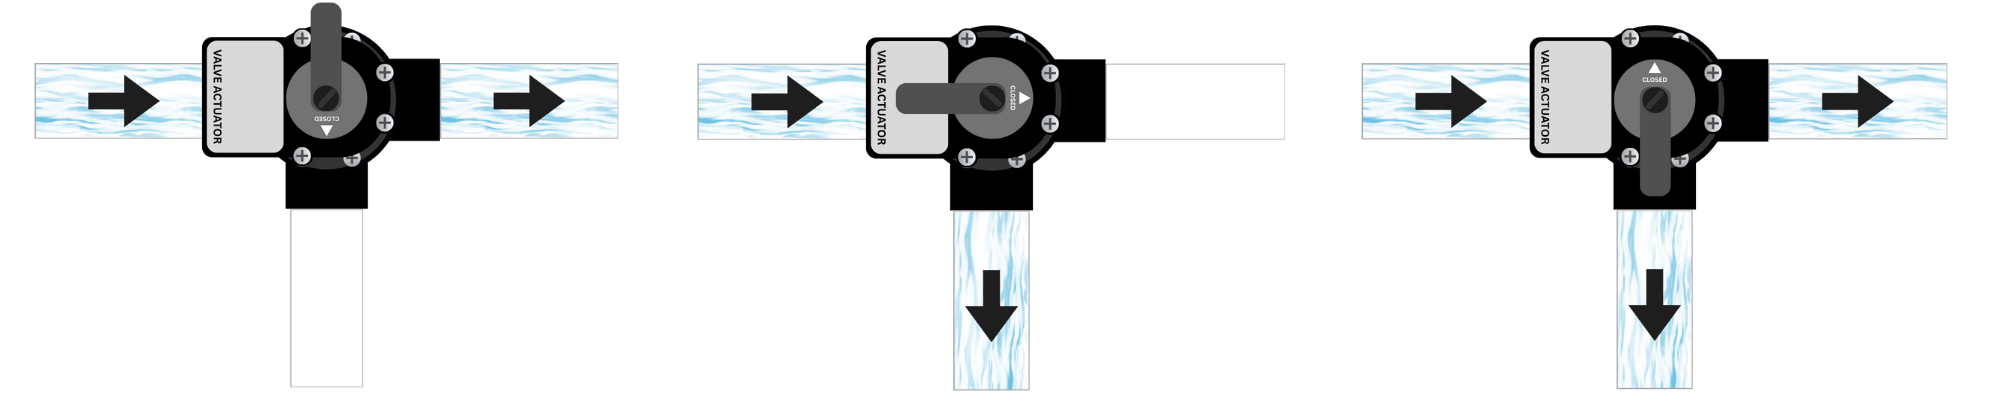

Right Position:
The actuator is mounted so the motor housing is aligned with the right-side port.


Step 3: Identify the Valve Inlet/Outlet
- Locate the 3-way valve body in your plumbing system.
- Trace the plumbing to identify the true inlet/outlet port, and compare it with the diagram above.
- Depending on the installation, the port may be on the center port or on a side port depending on how the system was plumbed.
- Confirm actuator orientation:
- The actuator must be mounted so that its position aligns with the blue arrow shown in the app.
- If the actuator is misaligned, The Attendant may attempt to open or close the wrong ports.
- In the app, select the Water Inlet Direction (e.g. Left, Middle, Right) that matches your valve configuration.
- Tap Apply and Save.
- Exit Installer Mode.
Step 4: Verify Operation
- Switch between Pool, Spa, or Feature modes in the app for the valve you just configured.
- Confirm that the valve rotates in sync with the expected water flow.
- If the movement is reversed, adjust the Water Inlet Direction setting in the app.
- If the movement is correct but controls the are backwards, flip the actuator’s direction switch (ON1 ↔ ON2) to reverse its rotation.