Equipment List
- Single VS Pump
- Salt Chlorine Generator
- Gas Heater
- Water Feature
- 1 – Actuator

The pool pictured above is a basic pool configuration that has one actuator and a water feature. Setting up this configuration in the Attendant involves two major steps:
First – Adding devices — In this step we will add every device on the pad to the Attendant configuration, specify brands, models and ports we are connected into.
Second – Linking added devices into a flow — In this step we will tell the Attendant how the various devices that were just added connect to each other hydraulically using the concept of a Flow. Flow’s allow the system to understand all possible paths that water can route in your pool. We will be setting up a separate flow for each pump (except for booster pumps).
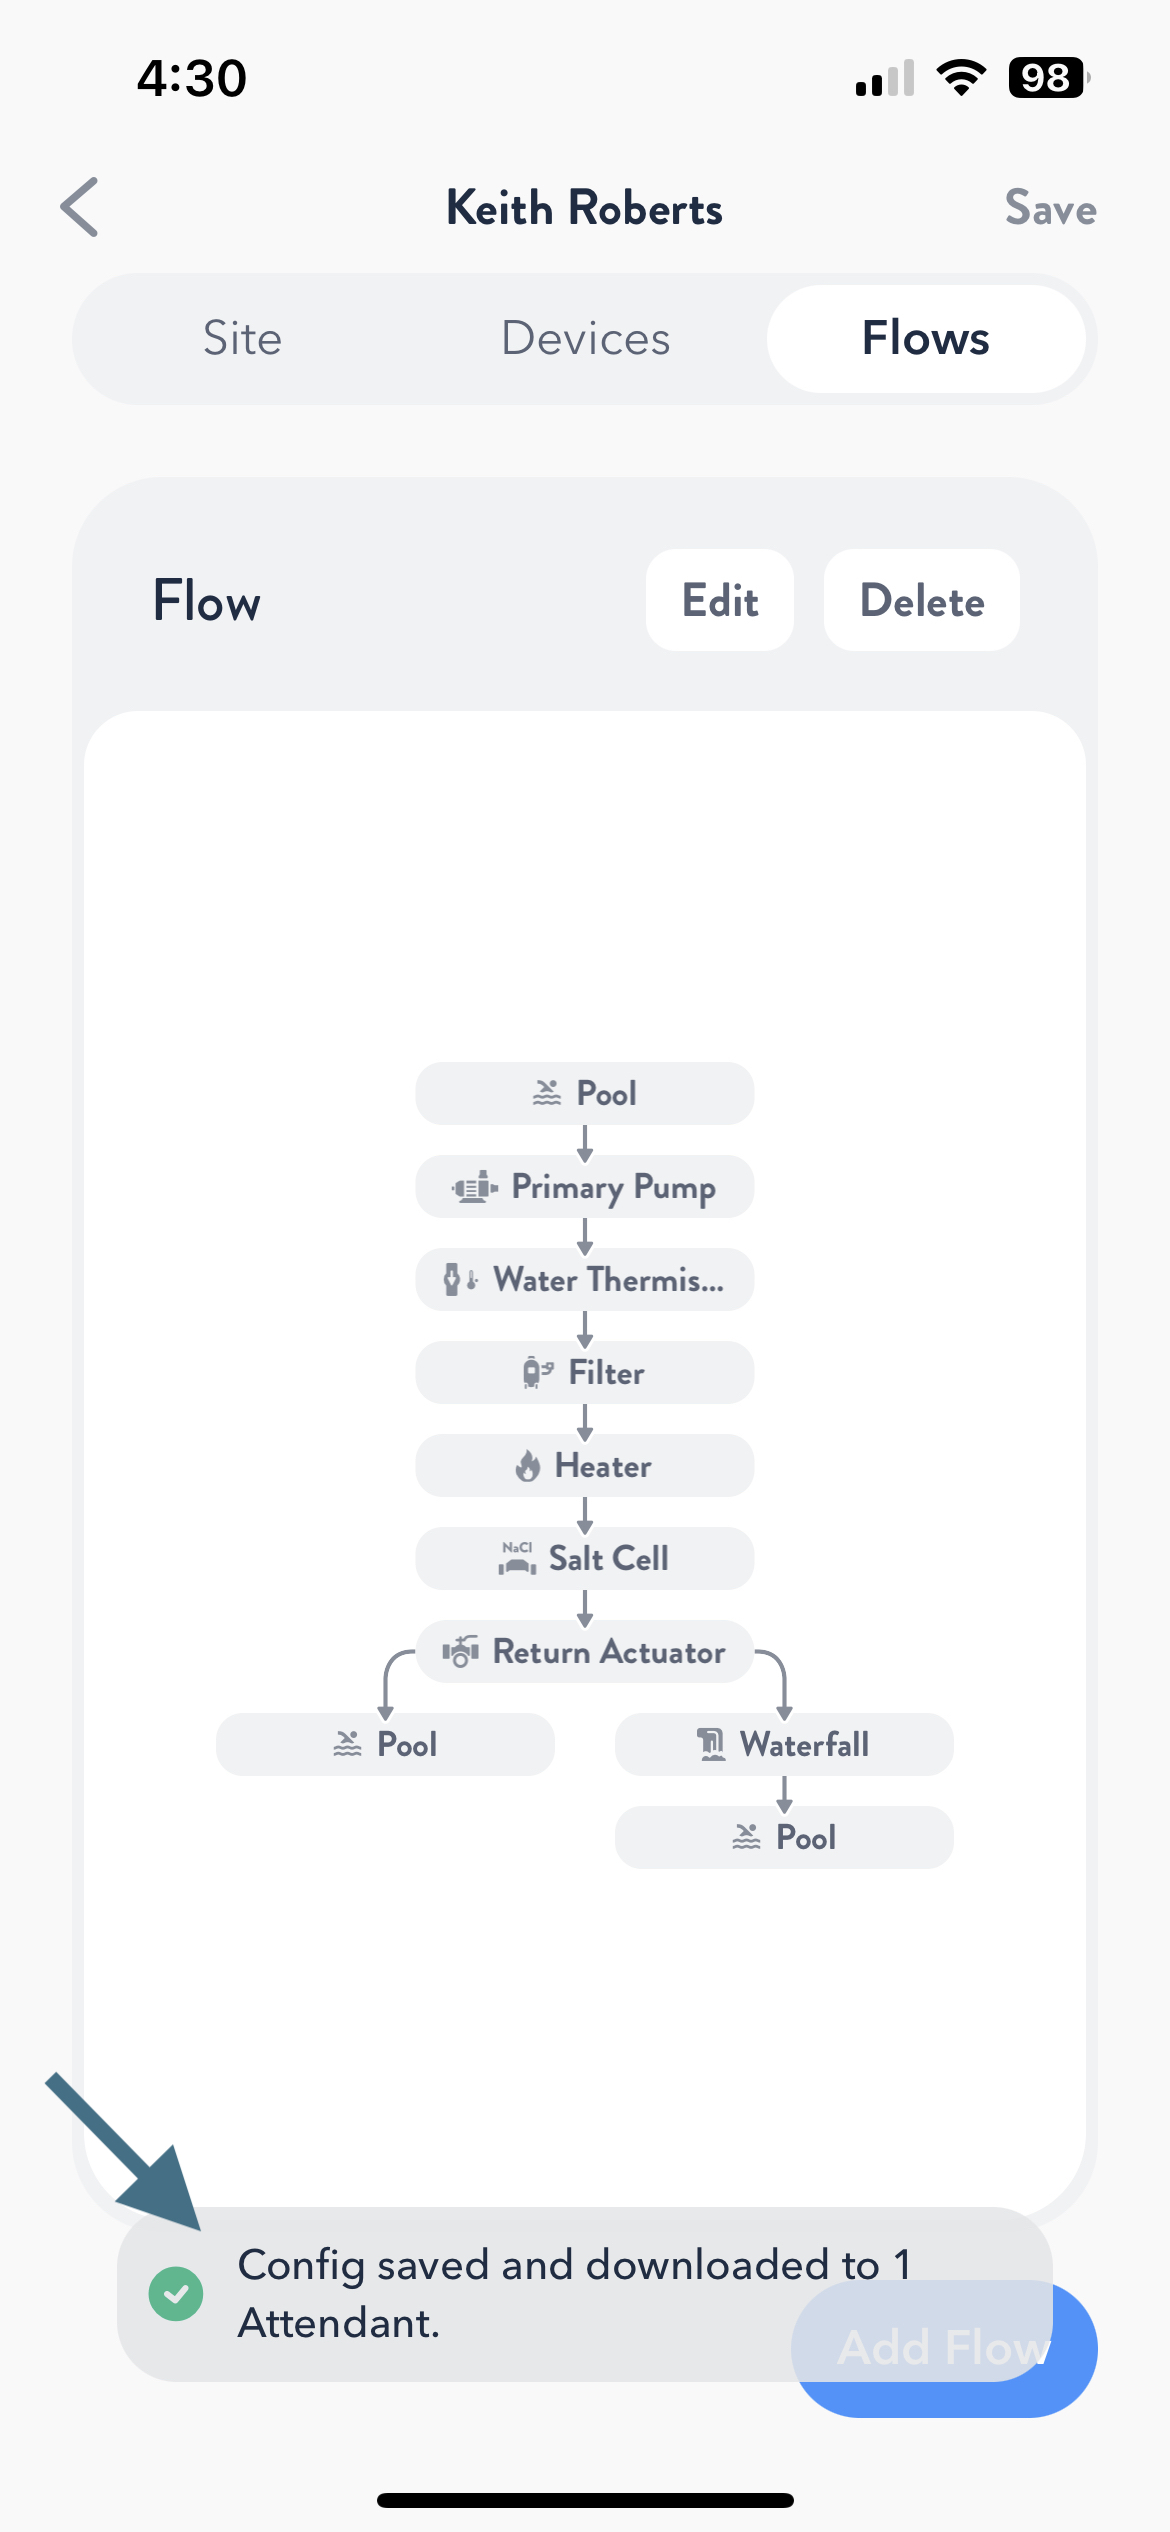
When complete you should have configured a flow that looks similar to the picture below. Please follow the directions in the following section to set up this configuration:

Interview
Once you have turned The Attendant on and connected it to the internet, the Attendant app will lead you through the “Interview” process. The interview process is designed to help create a template configuration that you can later customize. Start by pressing the “Interview” button on your mobile device, then answer the questions like you see in the pictures below.


After answering all the Interview questions, make sure you press “Finish”. This will take you into Installer Mode. Installer mode allows you to configure and test your devices.
Configuration
After entering Installer mode the app will take you to the “Site” tab. The Site tab will be used to make changes to the Bodies of Water, Water features (if applicable), Sensors, as well as Freeze Protect settings. Once on the “Site” tab, press the “Devices” tab at the top of the page. Now, you can select each piece of equipment with a red flag icon beside it and fill in the information about that piece of equipment (step by step photos below). Make sure that you press “Save” for each piece of equipment.


Configuring the Pump
The first piece of equipment is the Primary Pump. Press the arrow to edit pump properties. Now, if you choose you can rename the pump from Primary Pump by touching the name of the pump to edit. Next, touch Select under “Brand” and select the manufacturer of the pump from the drop down list. Next, select the “Model” block and select the model number from the drop down list. Next, select “Port Types” and select the port type that you are going to connect the wiring to. Next, select the “Number” block to select what port “Number” that you connected the pump to in The Attendant. Enter the Bus Identifier or verify that the Bus Identifier populated. Next, you can set the prime duration for the pump by sliding the slider bar. Lastly, you can set the minimum and the maximum speed that you want to allow the pump to run at. After making all of you selections, press “Save” at the bottom of the page.


Configuring the Heater
Next, select the Heater. You can rename the heater by pressing the “Heater” under the Name, you now can edit the name of the Heater. Next, fill in the Brand, Model, Ports Type, and Number, like you did on the pump. You may also set the minimum and maximum operating temperatures by sliding the respective slider bar. After you have entered all of the information, press “Save” at the bottom of the page.


Configuring the Salt Cell
Next, select the Salt Cell. You can rename the Salt Cell by pressing the “Salt Cell” under the Name, you now can edit the name of the Salt Cell. Fill in the Brand, Model, Salt Cell Type, Ports Type, and Number like you did before, then press “Save” at the bottom of the page.


Configuring the Water Temperature Sensor (Thermistor)
Next, select the Water Thermistor. You can rename the Water Thermistor by pressing the “Water Thermistor” under the Name, you now can edit the name of the Water Thermistor. Verify that the Ports Type and the Number are filled in on the Water Thermistor and press “Save” at the bottom of the page.


Configuring the Ambient Temperature Sensor (Thermistor)
Next, select the Ambient Thermistor. You can rename the Ambient Thermistor by pressing the “Ambient Thermistor” under the Name, you now can edit the name of the Ambient Thermistor. Verify that the Ports Type and the Number are filled in on the Ambient Thermistor and press “Save” at the bottom of the page.


IMPORTANT: Once you clear all of the red flags on the Devices tab, press “Save” in the top right corner of the app to push the configuration to The Attendant. You will see an alert that lets you know that we are saving the configuration and when it is completed, you will see an alert at the bottom of the app that states “Config saved and downloaded to 1 Attendant”.


Adding/Configuring the Water Feature
While you are still in “Installer Mode” select the “Flow” tab at the top right of the app. Press the “edit” button to edit the flow. Next, click the blue “+” button under the Salt Cell.This will pull up a list of icons. The icons list is comprised of three sections, Bodies of Water, Devices (existing and new), and Water Features. In the existing devices
Note: If an icon has already been used in a flow they will be greyed out and unavailable to select. If they are available to use, they will appear black in the list and are available for you to select.Note: If an icon has already been used in a flow they will be greyed out. If they are available to use, they will appear black in the list and are available for you to select.


Scroll down to the “New Device” section and press the “Actuator 3 Way” icon. Here you can rename the actuator, if you choose to. Next, fill in the Brand, Model, Ports Type, and Port Number. Press “Save” at the bottom of the page. Now, select the Blue “+” under the right side of the 3 way actuator. Scroll down the list of icons to the bottom where Water Features is located and press the “Waterfall” icon to select it.


Now, select the waterfall icon that you choose to use and edit any of the waterfall settings. Once you have made all selections, press “Save” at the bottom of the page. Next, click the Blue “+” below the waterfall and select “Pool” from the icon list to complete the flow for the waterfall.


After adding “Pool” to the flow, the screen will return to the finished flow. Press “Save” in the top right corner to save the configuration. You will see. amessage thatthe configuration is saving and can take up to 50 seconds to complete.Next, once the configuration has been saved you will see a message stating that the “Config saved and downloaded to 1 Attendant”.


Testing Equipment
From the Devices tab, you can test each piece of equipment to make sure that the configuration is correct. Start this process by setting the pump speed (in the example I have set the speed to 50%). Press the “Pump” icon next to the Primary Pump. This will turn the pump on. Verify that the pump is running. You will see RPM, Watts, or GPM depending on the make and model of the pump. Leave the pump running and now turn the heater on and verify that it is working. Once the heater has been tested, you can press the icon for the heater again to turn it off. Repeat these steps for all of your equipment to verify that everything is working. Once you complete the testing of the equipment, you can turn the Primary Pump off. Next, if you have actuators, test all of the Actuator(s) (click on the word “actuator(s)” for more information on how to test) that are in the flow.
Lastly, press the back arrow at the top left of the app to exit installer mode. Slide the slider bar to exit and return to normal operation of The Attendant.


Congratulations, the hardware set up is now complete. If you would like additional information about Port Types or Bus Identifier’s, please click on the corresponding links below.