Wiring the Blue-White Pump to The Attendant
Blue White A1A chemical dosing pumps require a special remote control cable (CABLE-M8). This cable doesn’t ship with the pump and must be requested from Blue White.
Disconnect power to the Blue White pump before connecting wires.
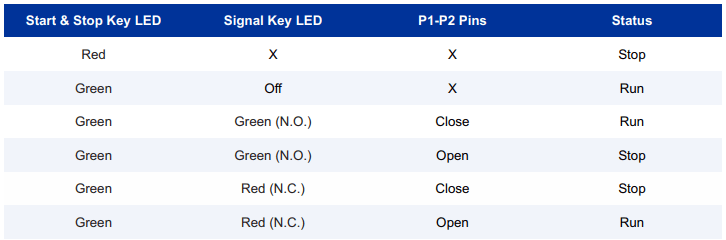
Connect P1 (Brown) and P2 (White) to an available RELAY on The Attendant.

Setting the Mode on the Blue-White Pump
The Signal, Start, Stop Key must have a green LED. To change from Red to Green, just press and hold the signal key for 5 – 7 seconds.
Programming the Blue-White Pump
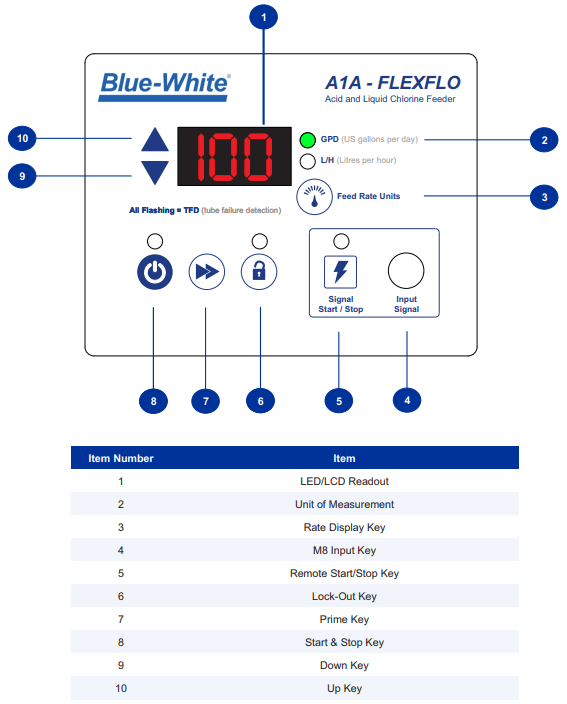
By default, this pump is set to dose 0 gallons per day (GPD), which prevents it from operating even if the contact is closed. After completing the wiring and restoring power to the chemical pump, you must set the desired GPD rate. To do this, use the up and down arrows to adjust the GPD rate to your preference. Once set, make a note of the selected GPD rate to program it into The Attendant.
Programming The Attendant
In Installer Mode, navigate to Devices and tap the blue + button at the bottom of the screen.
Under Devices, choose Chemical Pump. Next, select the chemical type and enter the pump’s maximum capacity, which you recorded earlier.
Then, set the port type to Relay and specify the relay number where you connected the Blue-White pump’s remote wires.

Adjust the Dilution Ratio and Priming Duration if needed.
Tap Apply at the top right of the screen.
Navigate to Flows and add the chemical pump to the appropriate flow.