Homeowners and pool professionals are always vigilant about the risk of an autofill device malfunctioning unnoticed. No one wants a surprise high water bill due to an undetected pool leak, or a stuck valve causing the pool to overflow into the yard.
Poolside Tech is excited to introduce the Autofill system for The Attendant. This new feature enables you to monitor how much water is being added to your pool while also providing alerts for any potential issues.
What’s an Autofill?
Autofill systems are typically controlled by a fill switch or water level sensor that activates when the pool’s water level drops too low. The system then adds water until the sensor or switch turns off.
The Attendant offers the ability to track the runtime of the Autofill system and notify the homeowner (and pool service professional) if the system adds more water than expected. Homeowners and service teams can also review all fill events through the Water Quality screen in the Poolside mobile app.
This guide will help you understand and configure this new feature so you can make the most of your poolside oasis. Let’s dive in!
Prerequisites
To utilize the Autofill system in The Attendant, you’ll need a method for sensing the water level and a mechanism to automatically fill the pool and/or spa.
Ensure the following devices are installed on your system:
- A water level sensor is required to detect when the pool’s water level is too low. These sensors can be either digital (metal, probe-like prongs) or analog (similar to a float).
- (Optional) A second sensor can be installed to detect when the water level is too high.
- You’ll also need an outdoor-rated water solenoid valve, connected to your domestic water supply according to local plumbing codes. (If the valve is low voltage, a transformer will be necessary.)
- Electrical connections between The Attendant and the water solenoid must be established.
- Ensure that The Attendant has at least one available high or low voltage (Heater) relay to power the water solenoid.
Click here for a list of recommended autofill components.
Wiring
Autofill Valve Wiring
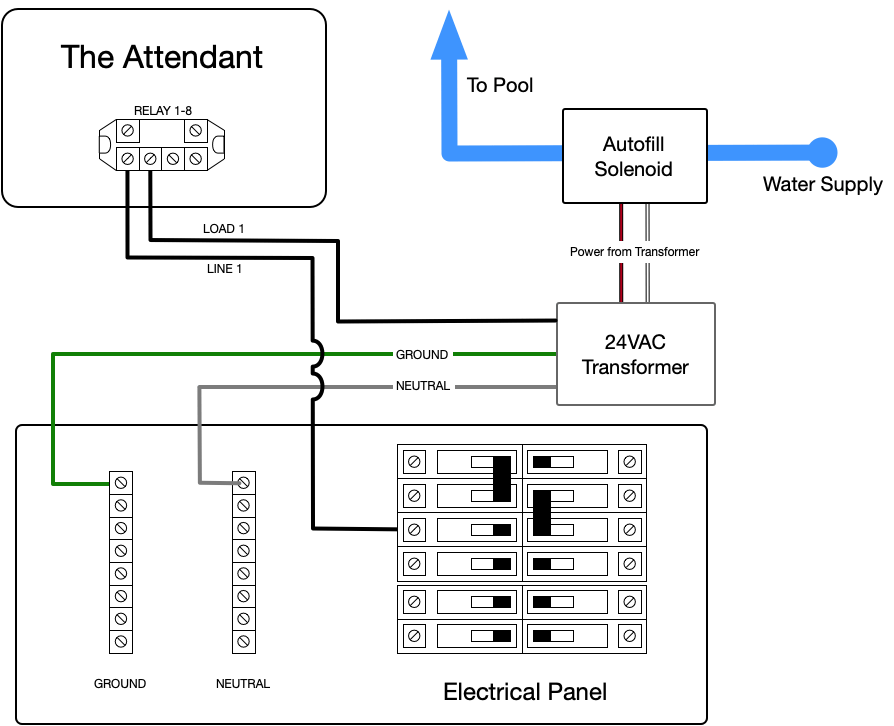
Autofill Solenoid Wiring using a High Voltage Relay
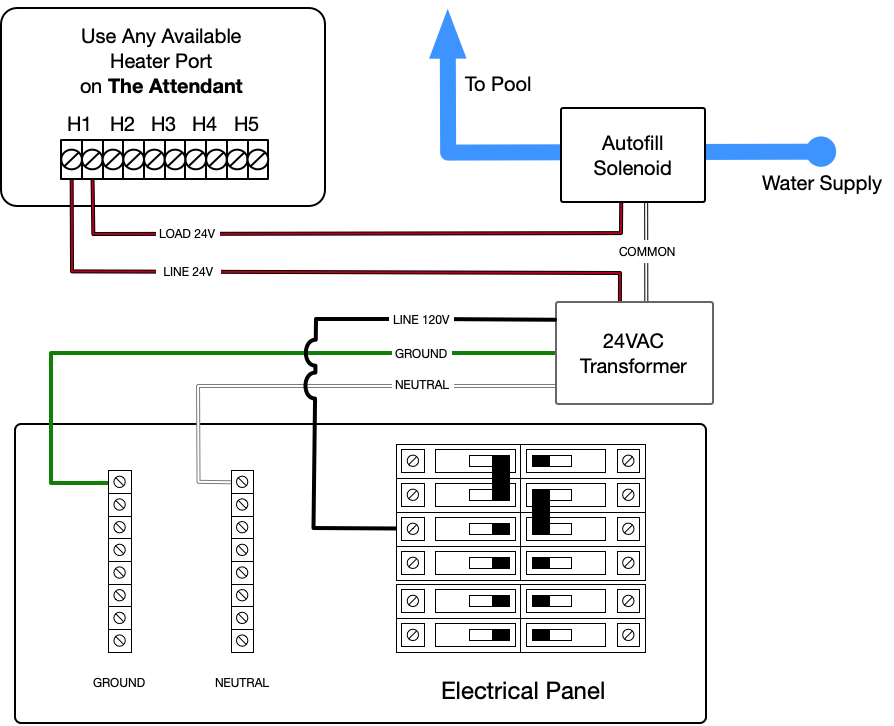
Autofill Solenoid Wiring using a Low Voltage H1-H5 Relay
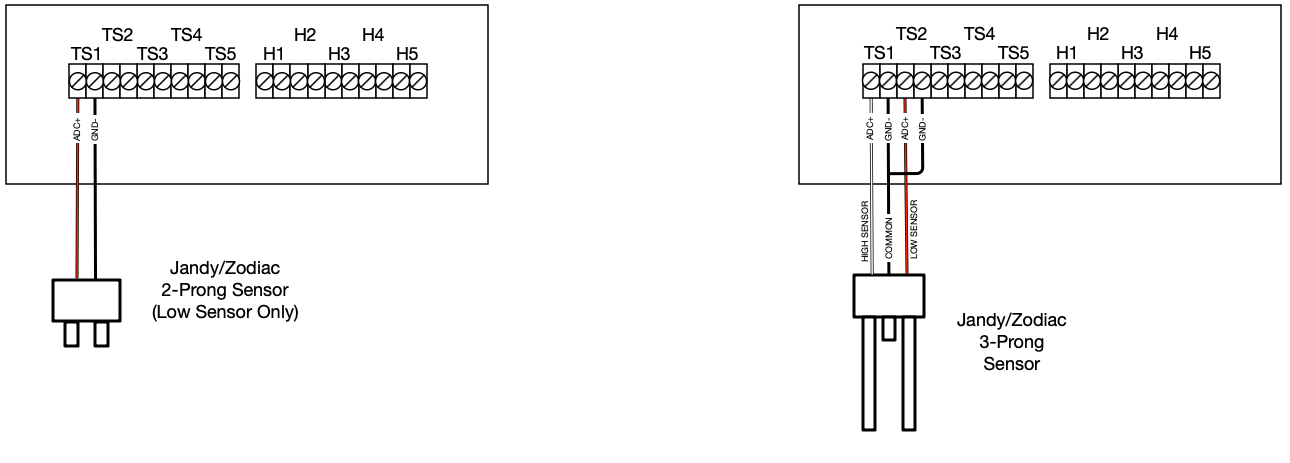
Probe Style Sensor Wiring
New Attendant Hub Board Wiring (Version 4 and above) Click Image to Enlarge
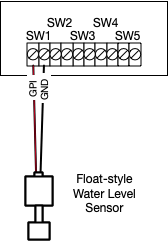
Float Style Sensor Wiring
Getting Up and Running
Once the hardware and electrical connections are complete, it’s time to configure The Attendant’s settings.
To begin, you’ll need to access Installer Mode on The Attendant. Open the mobile app, navigate to the hamburger menu, select Maintenance, then Installer Mode, and slide the confirmation bar from left to right.”
Adding the New Hardware Devices
Add a new Water Level Sensor
- Select Devices from the tab selector at the top. You will now see a listing of all of the hardware devices installed.
- Press the + (blue circle) icon to add a new device.
- Select “Water Level Sensor” from the bottom of the list.
- Input the Name of the sensor you are configuring. (ex. “Low Water Level Sensor”)
- Select the Body of water this sensor is measuring.
- Select the Level Sensor Port Type and Port Number of the sensor.
- Port Type: This can be one of “Switch” or “Thermistor.”
- If the sensor is a “float” type, select Flow Switch. This would connect into one of the SW1-5 ports on The Attendant.
- If the sensor is a “prong” type, select Temp Sensor. This would connect into one of the TS1-5 ports on The Attendant.
- Select the Sensor Type – Low or High.
- This defines whether the sensor detects when the water level is too low or too high.
- Signal Strength Threshold
- This option is only available if the sensor type is set to Thermistor. This value defines the detection offset threshold for “probe” type sensors only. It is recommended that you leave this setting at the default (30) unless there is a specific reason to change it.
- Select the Power Port and Port Number (H1-H5) only if the sensor is wired through one of the low voltage ports on The Attendant. This setting is solely for energizing the sensor and does not affect the solenoid valve.
- In certain regions, the chemical properties of the water may increase the risk of corrosion on probe type water sensors. While typically not necessary, enabling this option can extend the sensor’s lifespan by reducing how frequently it’s energized during normal operation.
- Click Apply
Add a new Autofill device
- Select Devices from the tab selector at the top. You will now see a listing of all of the hardware devices installed.
- Press the + (blue circle) icon to add a new device.
- Select “Autofill” device from the top of the menu.
- Input a Name for the Autofill. (ex. “Pool Autofill”)
- Select the Water Level Sensor (as defined above) that will control the Autofill.
- Select the Solenoid Valve Port Type and Port Number that the Autofill will use to control the water solenoid valve.
- Select High Voltage if the solenoid is wired to one of the high voltage relays on The Attendant.
- Select Low Voltage if it is wired to one of The Attendant’s H1-5 low voltage ports.
- Click Apply
- Click Save
Exit Installer Mode
- Exit Installer Mode. You can do this by first saving all of your changes and then pressing the back arrow in the upper left. You can then swipe from left to right to confirm you want to exit Installer Mode. This places The Attendant back into normal operating mode.
Configure the Software Controls
After the hardware devices have been added and saved in The Attendant, you can configure the user settings to activate the Autofill system.
In the mobile app, open the main menu, tap the hamburger icon, and navigate to Maintenance > Body of Water Settings > Autofill.
You will see a list of all bodies of water set up in The Attendant. Select the one connected to the autofill device, then configure and enable the settings based on your preferences.
Enabled
By default, the Autofill system is disabled. You must toggle this option in order to begin monitoring of your pool or spa.
Fill Rate in GPM
Input the Gallons Per Minute the water solenoid valve will be providing to the pool or spa. This value will be used to calculate how much volume is being refilled for the Autofill graph report.
Maximum Daily Run Time in Minutes
Input the maximum minutes per day that you would like the Autofill to operate. This is not per-event, but the sum total of all refill events on any given day. When this time is reached, an alert will be generated and displayed in the mobile app.
Fill Delay Time in Minutes
This setting defines how long The Attendant will wait to turn on the water solenoid valve after determining the water is too low. This is to help minimize false positives due to swimming or other activity in the pool or other body of water.
Run for Minimum Time
Once the system starts refilling, how long should the water remain on – even if low water is no longer detected. (5 Minute Default)
Click Save then < arrow.
Enabling Notifications and Additional Triggers
Now that the core configuration is complete, you can choose to set up notifications and an event trigger should your pool or spa remain in a “too low” or “too high” state.
From the main menu in the mobile app, tap the hamburger menu, select Maintenance, then Body of Water Settings, and finally Water Level.
Here you will see each Water Level Sensor that is set up in The Attendant. Click and configure per your preference.
Enabled
By default, this setting is disabled. You must toggle this option for the notification and trigger to work.
Action Type
There are two available options: Action & Alert and Alert Only. Action & Alert will trigger an event action and deliver alerts while Alert Only will only deliver alerts.
Start Delay
This option is only applicable to Action & Alert. This value defines how long The Attendant will wait (after detection) to trigger the “Trigger Item.”
Alert After
An alert will be sent this amount of minutes (from detection) letting you know that the water remains too low or too high. You will see these alerts on the main page of the mobile app.
Trigger Item (only if Action & Alert were selected in Action Type)
Once the Start Delay time elapses, The Attendant will automatically activate the pool or spa control you define here. Examples are “Pool Filter” or “Negative Edge.”
Click Save
Monitoring
In order to check in and monitor autofill events, you can take a look at the Water Quality section of the mobile app. To get there from the main menu, select the hamburger menu, then select Water Quality.
There you can find a Autofill graph that will show when the Pool or Spa needed to be refilled, and how long the Autofill was active.
In this example, the blue lines indicate when the Autofill was actively refilling the pool and at what rate (GPM/Gallons Per Minute) the water was flowing.
You can scroll left and right on this graph to view previous events from previous days.
Troubleshooting Information
The Attendant monitors probe-style sensors in two ways:
Maintainer Mode: The sensor is continuously monitored to ensure it is functioning properly.
Normal Operation: The sensor is checked once every 15 minutes. If a low water level is detected, it will continuously monitor until proper level is achieved.
Winterize / Freeze Protection
- Refer to the manufacturer’s guidelines to properly winterize the solenoid valve, water supply, and sensor.
- Deactivate the autofill sensor on The Attendant for all winterized bodies of water.
Steps to Disable Autofill:
- Tap the hamburger menu in The Attendant App.
- Navigate to Maintenance.
- Select Body of Water Settings.
- Choose Autofill.
- Select the specific body of water that has been winterized.
- Tap the button to the right of Enabled to disable it.
- Click Save.
- Navigate back with the left arrow.
- If Water Level Alerts have been activated, you can disable those as well by selecting Water Level
- Select the body of water you would like to disable.
- Tap the button to the right of Enabled to disable it.
- Click Save.